Contents15 sections
This guide was first published in German on handgetestet.de.
If you are wiring a shell construction today, you are deciding on the building services for the next thirty years. Wireless can be retrofitted later; cables in the screed cannot. For a hardwired smart home without the planning effort of a large bus system, we consider Homematic IP Wired a sensible route, and the first component is always the same: the Wired Access Point HmIPW-DRAP. Without it, not a single actuator switches.
This article explains how the system is structured, what ends up in the distribution board, which cables belong in the wall and where the limits are. At the end, you will find the devices a typical single-family home starts with.
The principle: intelligence in the distribution board, push buttons in the wall
In a conventional installation, every light runs through a switch that interrupts the current directly. Homematic IP Wired reverses this. The 230-volt lines to lights, roller shutters and valve actuators run in a star layout to the main distribution board or a sub-distribution board. There, the actuators sit on the DIN rail, the standardized mounting rail that also holds the circuit breakers and RCDs. The push buttons in the room now only report that someone has pressed them.
All devices are connected via the Homematic IP Wired Bus. It carries data and at the same time 24 volts DC for the electronics. The manufacturer, eQ-3, describes it as a safety extra-low voltage circuit (SELV), separate from the mains. This has a practical advantage: according to the system manual, input modules for push buttons can be connected with telecom or low-voltage cables, because their inputs are galvanically isolated from 230 volts.
A detail that matters in everyday life: each device stores its own time profiles and direct links. If the internet connection or a hub fails, the push button in the hallway still switches the light, and the roller shutter continues to follow its schedule. Only programs and automations that link several devices via the hub pause in that case.
Ring, line, 300 meters: what the bus can do
The access point has two independent bus outputs. According to the system manual, each supplies up to 72 watts, or 3 amps. You can set up two separate lines or close both outputs into a ring. The ring has an advantage you only appreciate once a drill hits the cable: if it is interrupted at one point, the system automatically splits into two lines, and all devices remain reachable.
There are still limits. In a ring, one access point supports a maximum of 64 devices; eQ-3 cites up to 120 per installation. Inside the distribution board, the short bus connectors supplied are sufficient. From a length of three meters, the manufacturer requires shielded cables, such as network cable from Cat5e, J-Y(St)Y 2 × 2 × 0.8 mm telecom cable or green EIB bus cable. These allow lengths of up to 300 meters.
One point electricians need to observe in the shell construction: according to the manual, network and telecom cables do not have the necessary dielectric strength to be laid together with 230-volt single conductors. If they run close together, a partition is required. The green EIB bus cable, on the other hand, may run next to 230 volts. If you are laying conduit in a new build anyway, you will therefore usually go straight for EIB cable.
Planning with the electrician
Connecting it yourself is not an option here. The access point’s instructions require installation in a distribution board in accordance with DIN 43871 and DIN 18015 (German standards for distribution boards and electrical installations in residential buildings), wiring in accordance with VDE 0100, and compliance with the grid operator’s Technical Connection Conditions. Work on the 230-volt network is reserved for a qualified electrician. It makes sense to involve the electrician as early as the floor plan stage, not only during the shell construction.
What belongs on the planning table is manageable. Every light, every roller shutter and every heating circuit gets its own cable to the distribution board. Then there is the bus cable to every room with push buttons, thermostats or presence detectors. The distribution board has to be larger than usual: the access point, power supply and each actuator take up 4 modules each, and each switching channel may need its own circuit breaker. eQ-3 explicitly recommends generously sizing distribution boards, boxes and cables, and documenting everything in writing. Waste heat counts too. According to the manual, the dimmer actuator dissipates up to 6.5 watts and the 8-channel switch actuator up to 4.6 watts.
If you plan to do some of the work yourself, such as pulling the bus cable into conduit, you should still only work with insulated tools and never on live cables. What makes a safe set is explained in the guide to VDE tools (in German).
The components compared
| Model | Function | Key data according to manufacturer | Best for |
|---|---|---|---|
| Homematic IP Wired Access Point HmIPW-DRAP | Central interface, powers the bus | 2 bus outputs of 72 W each, up to 120 devices, 4 modules | Every Wired installation |
| Homematic IP Wired power supply HmIPW-DRPS4 | 24 V supply | 96 W, 100 to 240 V AC, 4 modules | Every Wired installation |
| Homematic IP Wired switch actuator HmIPW-DRS8 | Switching lights and outlets | 8 channels, up to 80 A combined | Many lighting circuits |
| Homematic IP Wired blind actuator HmIPW-DRBL4 | Roller shutters, external venetian blinds, awnings | 4 channels, up to 500 W each | Homes with shading |
| Homematic IP Wired dimmer actuator HmIPW-DRD3 | Dimming lights | 3 channels, trailing edge, LED 100 W each | Living and dining areas |
| Homematic IP Wired input module HmIPW-DRI32 | Reading push buttons, switches, contacts | 32 inputs | Many conventional push buttons |
| Homematic IP Wired wall thermostat HmIPW-WTH | Controlling room temperature | Flush-mounted, 55 mm frame, measures humidity | Underfloor heating |
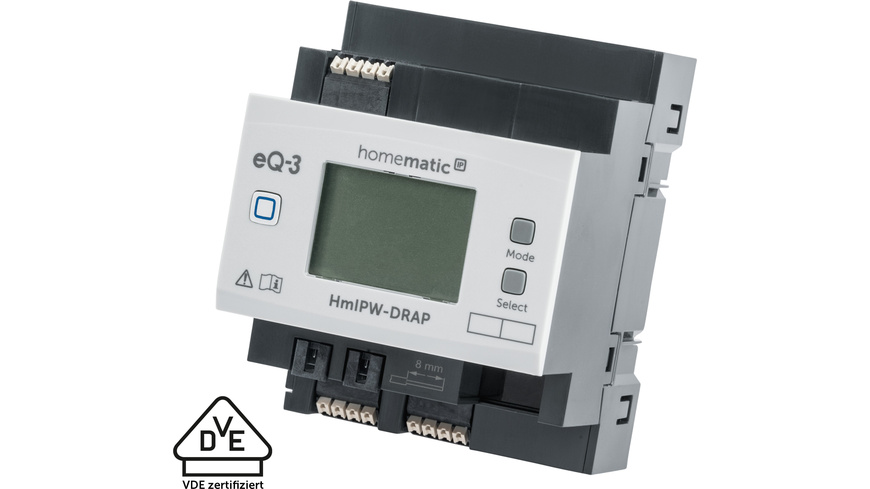
Homematic IP Wired Access Point HmIPW-DRAP
Our recommendation for getting started, because nothing works without it. The access point powers both bus lines, has an illuminated display for commissioning directly in the distribution board and is connected to the home network via LAN. For a purely wired system, it is sufficient on its own, and operation is then via the Homematic IP app. That is exactly where the drawback lies: without an additional hub, app control and configuration run via the manufacturer’s cloud. If you want local control, add the Home Control Unit or the CCU3. Which hub suits which home is compared in our guide to the smart home hub. eQ-3 cites a period of more than five years for security updates.
Homematic IP Wired power supply HmIPW-DRPS4
The access point needs its own 24-volt power supply. According to ELV (a German electronics retailer), the matching unit from eQ-3 delivers 96 watts and can be connected in parallel to increase output or redundancy. A third-party DIN rail power supply is permitted if it meets the requirements in the manual: 24 volts with a maximum deviation of 5 percent, SELV, short-circuit-proof. The cable from the power supply to the access point may be no more than three meters long.
Homematic IP Wired switch actuator HmIPW-DRS8
Eight relays for lights, outdoor outlets or fans. According to the manual, the load can be distributed in two ways: all eight channels with 10 amps of resistive load each, or two channels with 16 amps and the rest with 8 amps. Each channel is protected with a type B or C circuit breaker. For smaller homes, there is the 4-channel actuator HmIPW-DRS4, which switches 16 amps and up to 200 watts of LED load per channel. If you only want to retrofit individual rooms, wireless flush-mounted actuators are a better choice; see our guide to the flush-mounted actuator (in German).
Homematic IP Wired blind actuator HmIPW-DRBL4
Four channels for roller shutters, external venetian blinds and awnings, up to 500 watts each. According to ELV, the actuator also sets the slat angle on venetian blinds. With a window contact, the app prevents the roller shutter from lowering in front of an open patio door. One limitation: DC motors with polarity reversal are not supported. If you are looking for wireless solutions for existing buildings, you will find them in the guide to smart roller shutter control (in German).
Homematic IP Wired dimmer actuator HmIPW-DRD3
Three trailing-edge dimmers. According to the manual, each channel handles 200 watts of incandescent or halogen load, but only 100 watts with LED lamps that have a built-in driver. That is enough for a dining table light and a few spots. Each channel can be connected to a different phase and a different RCD zone. Whether a particular LED lamp can be dimmed without flicker depends on the lamp. Clarify that before buying larger quantities.
Homematic IP Wired input module HmIPW-DRI32
This is where the push button cables end. 32 inputs accept push buttons, switches or reed contacts from windows. The appeal: ordinary push buttons from any switch range sit in the room, and which push button switches what can be reassigned later in the app without touching a cable. If you need fewer inputs, go for the 16-channel module HmIPW-DRI16.
Homematic IP Wired wall thermostat HmIPW-WTH
The thermostat sits in the flush-mounted box, fits 55 mm frames from Berker, Busch-Jaeger, Gira, Jung, Merten and others according to ELV, and draws power and data via the bus. No batteries are needed. It measures temperature and humidity and controls the heating zones together with an underfloor heating controller, such as the HmIPW-FAL230-C6 for six zones with 230-volt valve actuators. It cannot control wireless radiator thermostats. More on controlling underfloor and surface heating is in the guide smart underfloor heating control (in German).
Wired and wireless together
A wired system does not rule out wireless. On the contrary. The manual points out that the position of a push button no longer has to be fixed during the shell construction, because wireless push buttons can be added at any time. For wireless and wired devices to work together in one installation, you need a Homematic IP Access Point or the Home Control Unit in addition to the Wired Access Point. A common plan in new builds: lighting, roller shutters and heating wired, with smoke detectors, window contacts and additional push buttons wireless.
A warning for older installations: the older Homematic Wired system works with a different bus. According to eQ-3, its cables must not be physically connected to the Homematic IP Wired bus.
And KNX?
The obvious question when building a house. KNX is an open standard backed, according to the KNX Association, by more than 500 manufacturers with over 8,000 certified products. Devices from different brands can be mixed in one system, and it is programmed by specialist installers using the ETS software. Homematic IP Wired, by contrast, is a system from a single manufacturer. The range is smaller, but it is set up via an app, and channels can be switched directly on the actuator’s display, which according to eQ-3 shows on the construction site whether the wiring is correct. For a single-family home with lighting, shading and underfloor heating, we consider Homematic IP Wired sufficient. If you want to combine components from many manufacturers or automate a commercial building, talk to your electrician about KNX.
How we would start
- Mandatory in every home: Access Point HmIPW-DRAP and power supply HmIPW-DRPS4.
- Lighting: one 8-channel switch actuator for every eight or so lighting circuits, plus a dimmer actuator for the living and dining area.
- Push buttons: each rocker occupies one input. Count beforehand whether you need 16 or 32 inputs.
- Shading: one blind actuator for every four roller shutters.
- Heating: a wall thermostat per room and an underfloor heating controller in the heating circuit manifold.
No starter kit is as important as the conduit. An additional bus spur into every room is quickly prepared with conduit during the shell construction. Afterward, it is hardly feasible.
For existing buildings without a bus cable, there are wireless actuators for the DIN rail; see the guide smart home in the fuse box (in German).
The wireless version and its sets are explained in the guide to Homematic IP (in German).
Frequently asked questions
How does Homematic IP Wired work?
The 230-volt lines to lights, roller shutters and valve actuators run in a star layout to the distribution board, where the actuators sit on the DIN rail. The push buttons in the room only report that someone has pressed them. Everything is connected via the Wired Bus, which carries data and 24 volts DC.
Does Homematic IP Wired work without the internet?
The basic functions do. Each device stores its own time profiles and direct links, so the push button still switches the light. Only programs spanning several devices pause. Without an additional hub, app control and configuration run via the cloud; for local control, use the Home Control Unit or CCU3.
Which cable does the Homematic IP Wired bus need?
From three meters, eQ-3 requires shielded cables, such as network cable from Cat5e, J-Y(St)Y telecom cable or green EIB bus cable, which allow lengths of up to 300 meters. Only the EIB cable may run next to 230-volt conductors, which is why EIB cable is usually pulled straight away in new builds.
What is the difference between Homematic IP Wired and KNX?
KNX is an open standard from many manufacturers, programmed by specialist installers using the ETS software. Homematic IP Wired comes from a single manufacturer, the range is smaller, and it is set up via an app. For a single-family home with lighting, shading and underfloor heating, we consider Wired sufficient.
Can wireless and wired devices be combined?
Yes. In addition to the Wired Access Point, this requires a Homematic IP Access Point or the Home Control Unit. A common plan: lighting, roller shutters and heating wired, with smoke detectors, window contacts and additional push buttons wireless. The older Homematic Wired, however, must not be connected to the new bus.
How many devices does a Wired Access Point manage?
A maximum of 64 in a ring; eQ-3 cites up to 120 per installation. Each of the two bus outputs supplies up to 72 watts. When closed as a ring, the system automatically splits into two lines if there is a break, and all devices remain reachable.
Sources
- Homematic IP: Wired Access Point
- eQ-3: Homematic IP Wired system manual (PDF)
- eQ-3: HmIPW-DRAP user manual (PDF)
- eQ-3: HmIPW-DRAP data sheet (PDF)
- Homematic IP: Comparison of hubs (PDF)
- ELV: Wired Access Point HmIPW-DRAP
- ELV: Wired power supply HmIPW-DRPS4
- ELV: Wired switch actuator HmIPW-DRS8
- ELV: Wired switch actuator HmIPW-DRS4
- ELV: Wired blind actuator HmIPW-DRBL4
- ELV: Wired dimmer actuator HmIPW-DRD3
- ELV: Wired input module HmIPW-DRI32
- ELV: Wired wall thermostat HmIPW-WTH
- ELV: Wired underfloor heating controller HmIPW-FAL230-C6
- KNX Association: What is KNX?
Where to buy
- Homematic IP Wired Access Point HmIPW-DRAPView at ELVAvailable in Germany: ELVCheck price at Amazon.deAvailable in Germany: Amazon.de
- Homematic IP Wired Netzteil HmIPW-DRPS4View at ELVAvailable in Germany: ELV
- Homematic IP Wired Schaltaktor HmIPW-DRS8View at ELVAvailable in Germany: ELVCheck price at Amazon.deAvailable in Germany: Amazon.de
- Homematic IP Wired Jalousieaktor HmIPW-DRBL4View at ELVAvailable in Germany: ELVCheck price at Amazon.deAvailable in Germany: Amazon.de
- Homematic IP Wired Dimmaktor HmIPW-DRD3View at ELVAvailable in Germany: ELV
- Homematic IP Wired Eingangsmodul HmIPW-DRI32View at ELVAvailable in Germany: ELV
- Homematic IP Wired Wandthermostat HmIPW-WTHView at ELVAvailable in Germany: ELVCheck price at Amazon.deAvailable in Germany: Amazon.de